Renterra changelog
Inventory Notes on Invoices and Contracts
You are now able to add your custom notes from Inventory to Invoices and Contracts! Let your customers know any special requirements, insurance details and more.
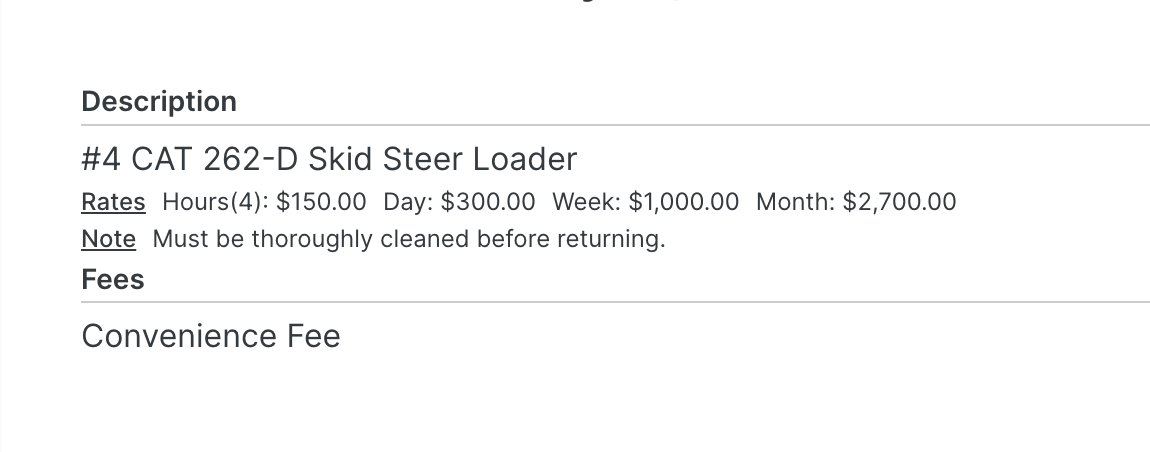
You can edit the note on the default Inventory Item's page, by clicking the pencil under the Information box.
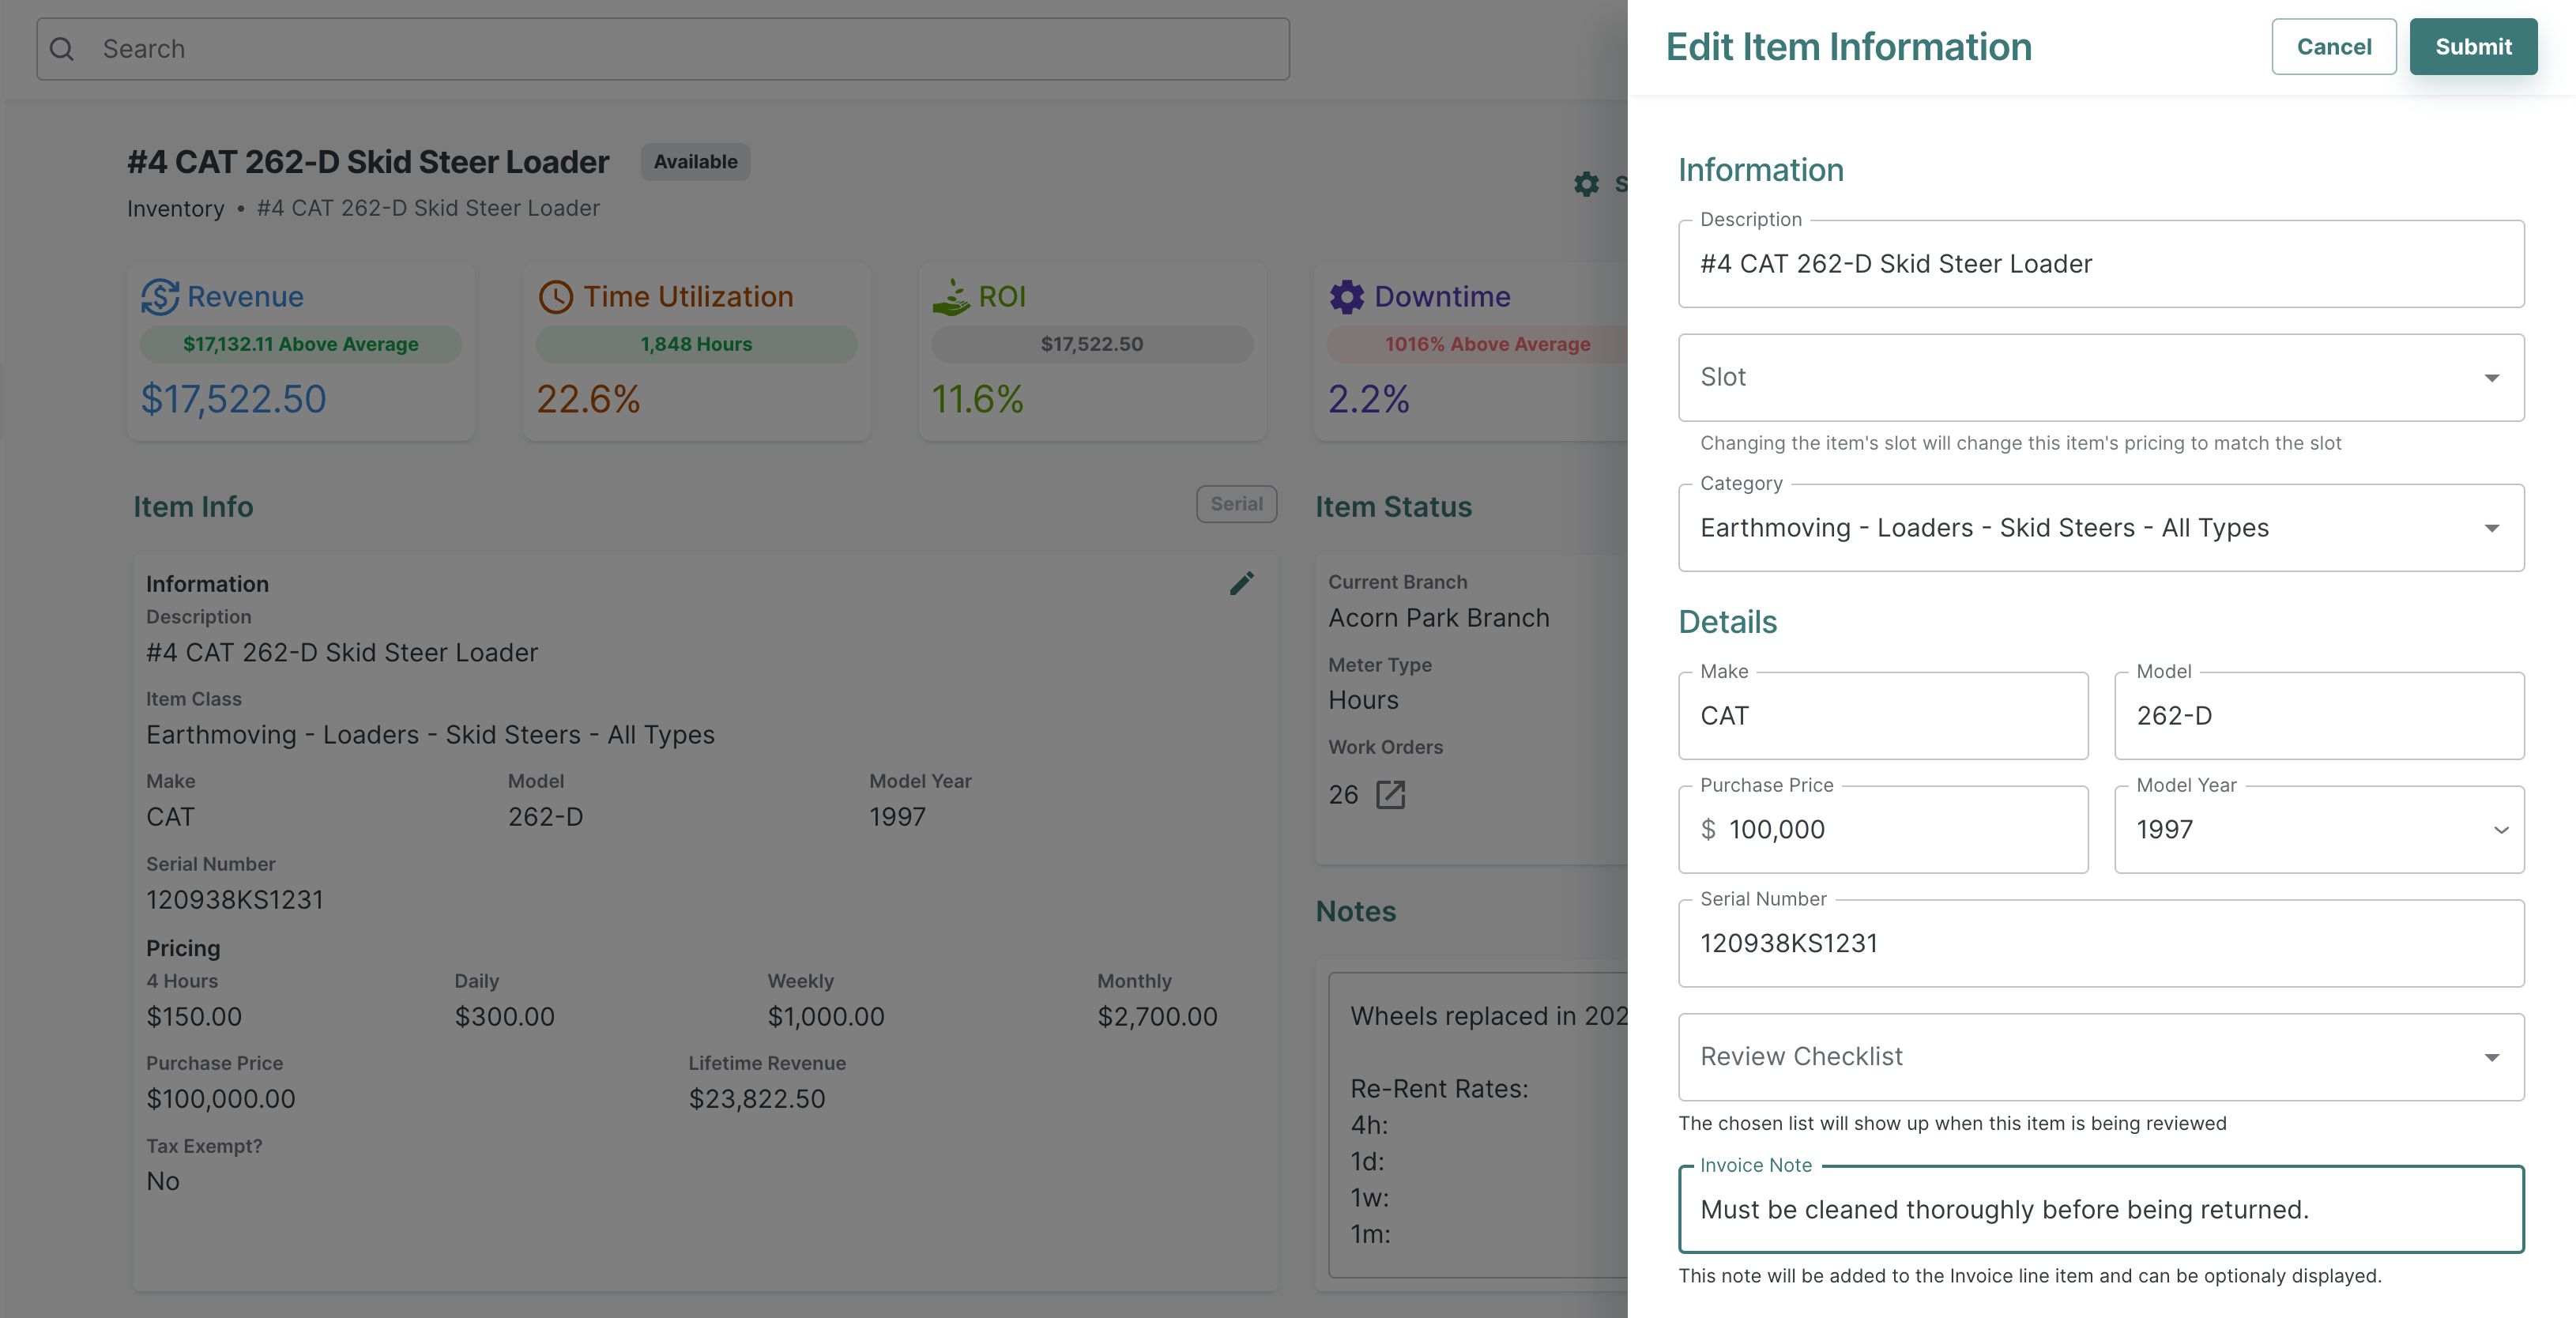
You can enable these notes on all Invoices by default by going to Admin Settings, Orders, and then Document Settings. You can also turn the notes on or off on individual Invoices.
For further information, please read this Help Desk article.
Grouping and Resolving Items with Slots
A Slot is a central category for a group of items. An order can have Slots added to it which will later need to be resolved by selecting an individual item before checkout.
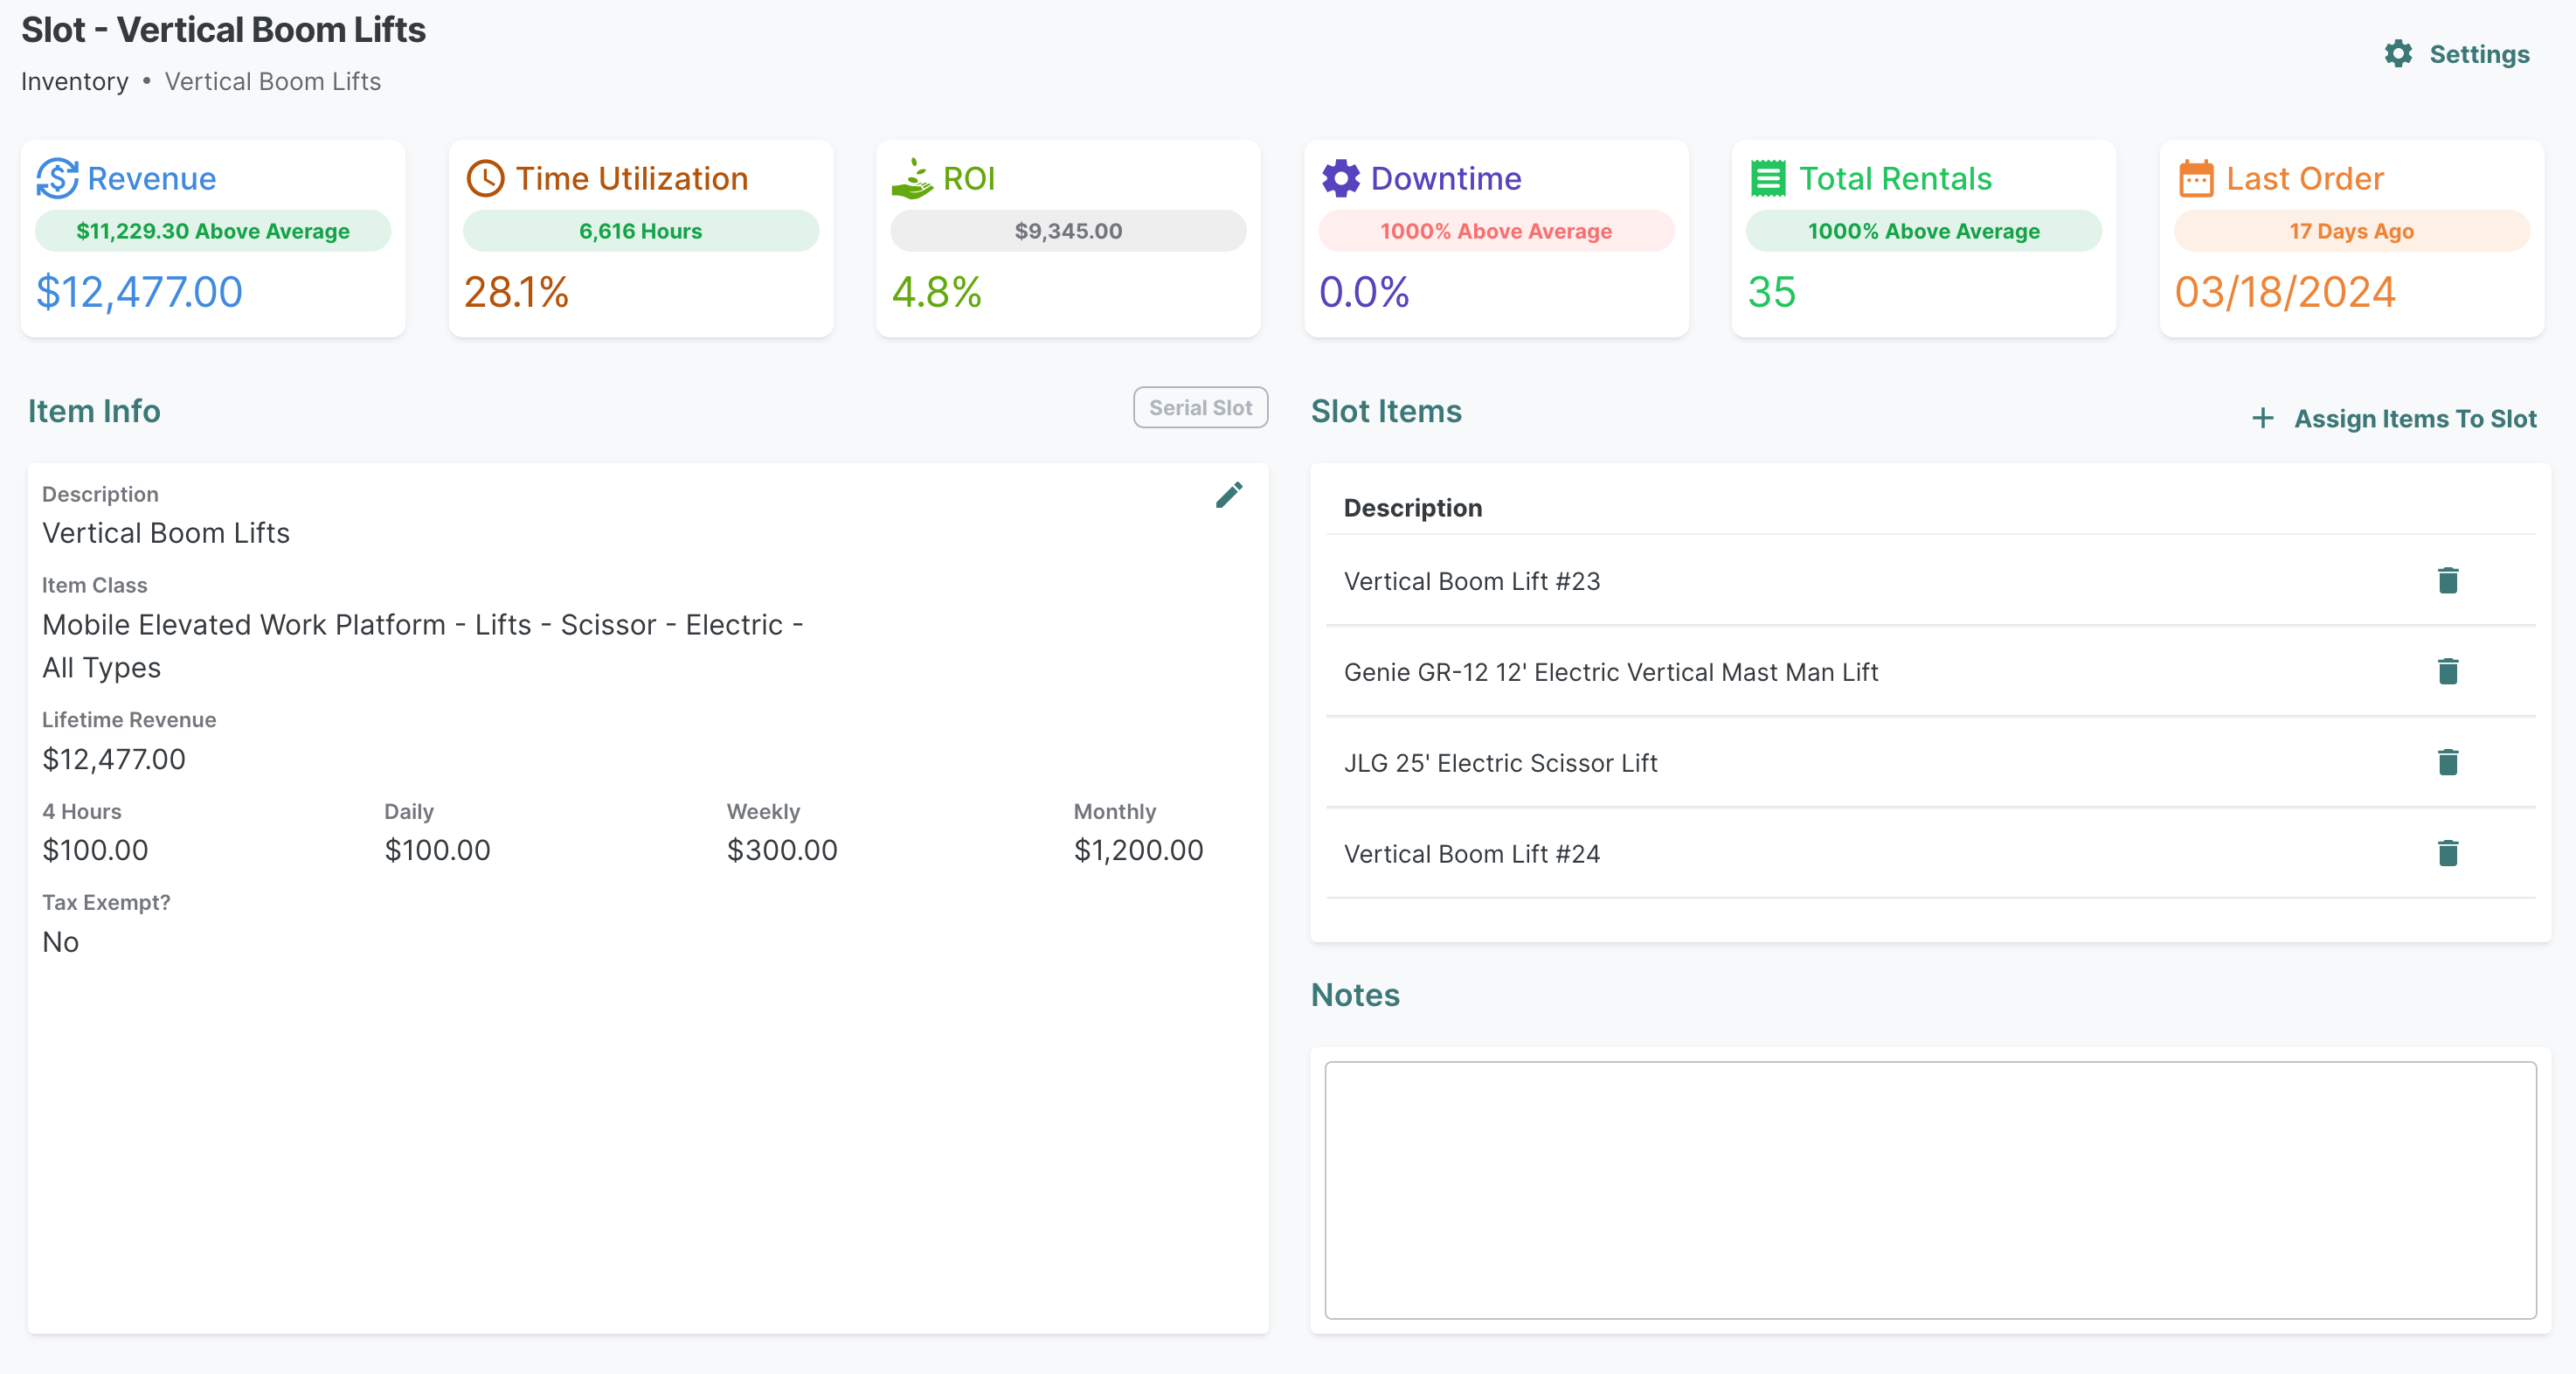
You can find Slots on the inventory page. Slots can have items of the same type ("Serial", "Bulk", or "Sale") within them.
For example, imagine that you have 4 Vertical Boom Lifts. Each skid steer is a serial item in your inventory, with a specific name (i.e. Vertical Boom 5T0F, Vertical Boom VL42, etc.). You can now create a Slot named "Vertical Boom Lift" and add all 4 items to the slot. Now, when a customer calls and asks for a skid steer, you can simply place the slot "Skid Steer" on the order, rather than choosing the specific item.
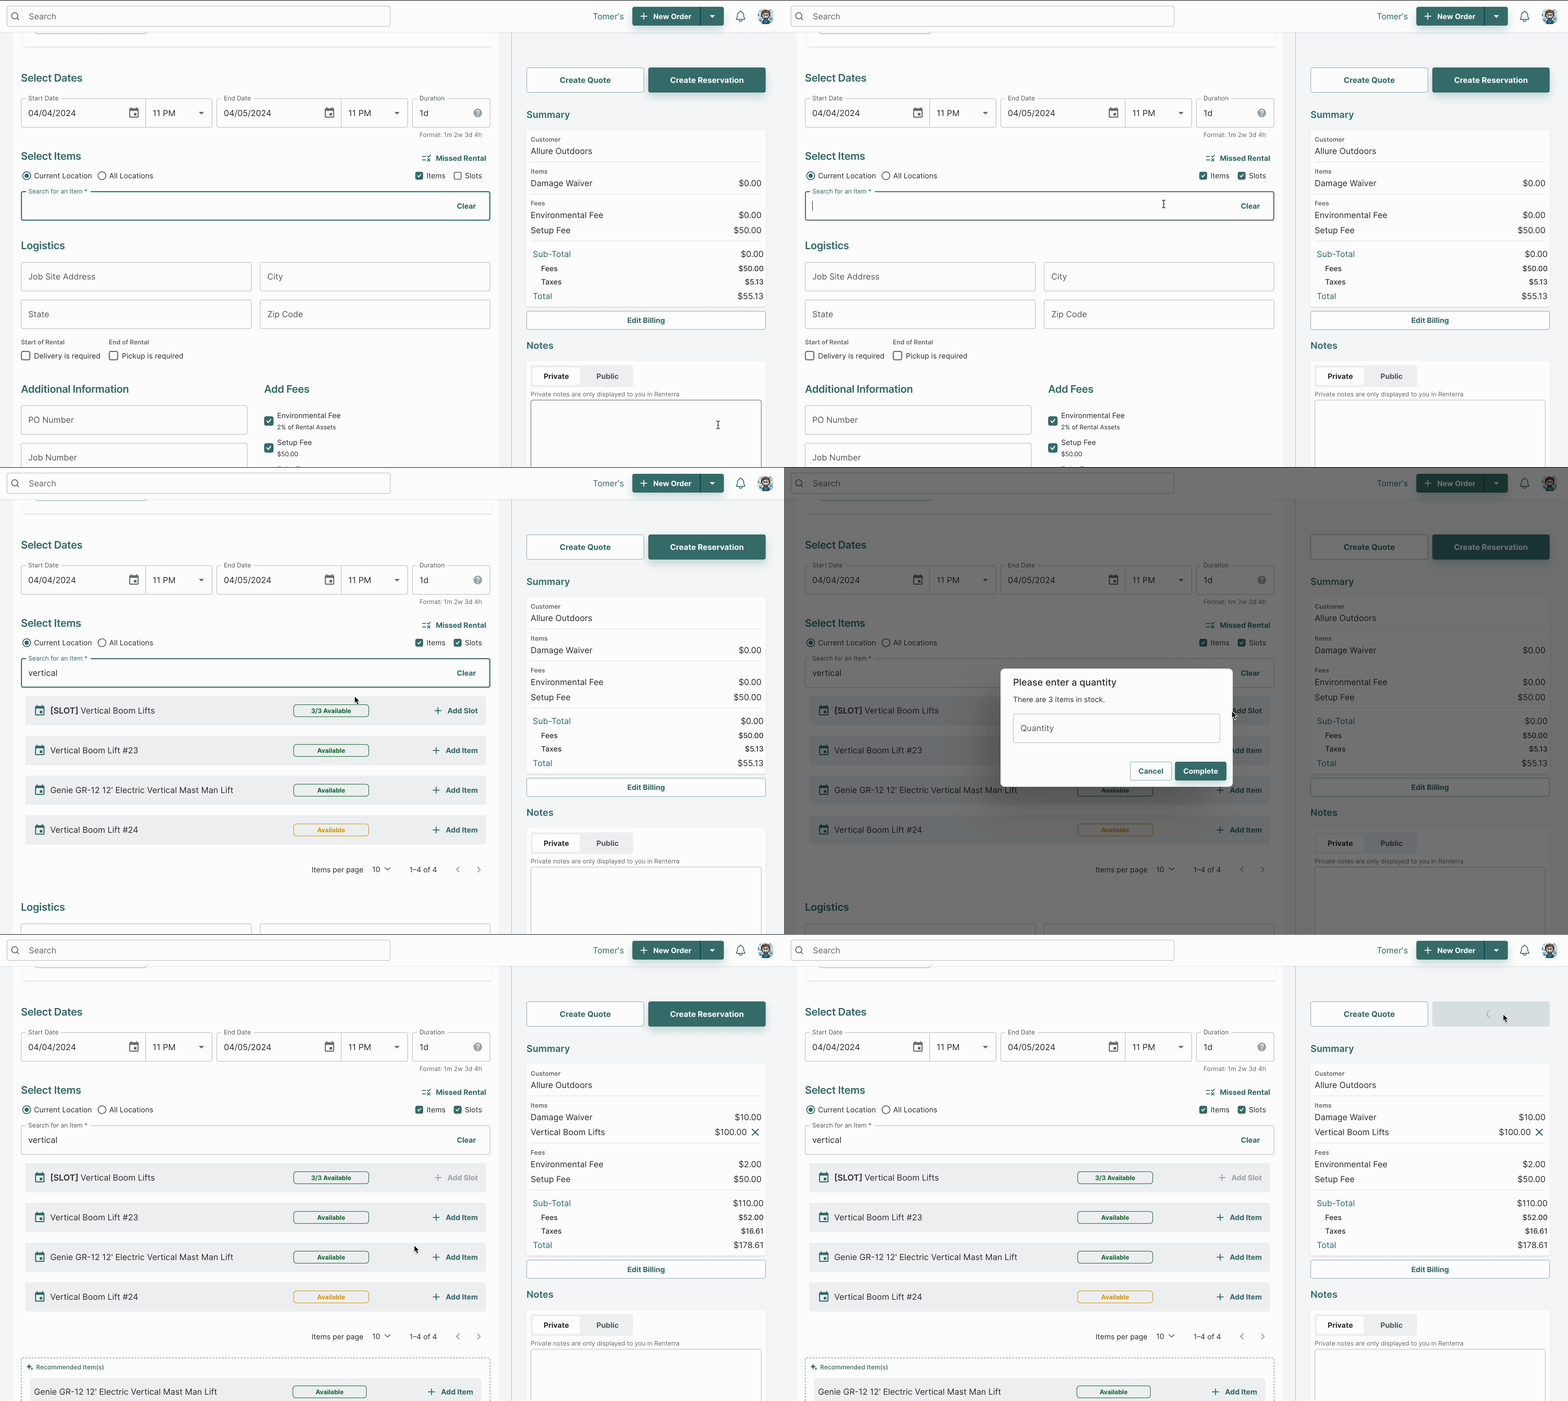
Slots allow you to see availability across multiple items when creating orders. On the New Order page, when you type the name of a Slot, you will see how many items of that slot are available.
Slots can be resolved both on the site, or on the app by driver during checkout.
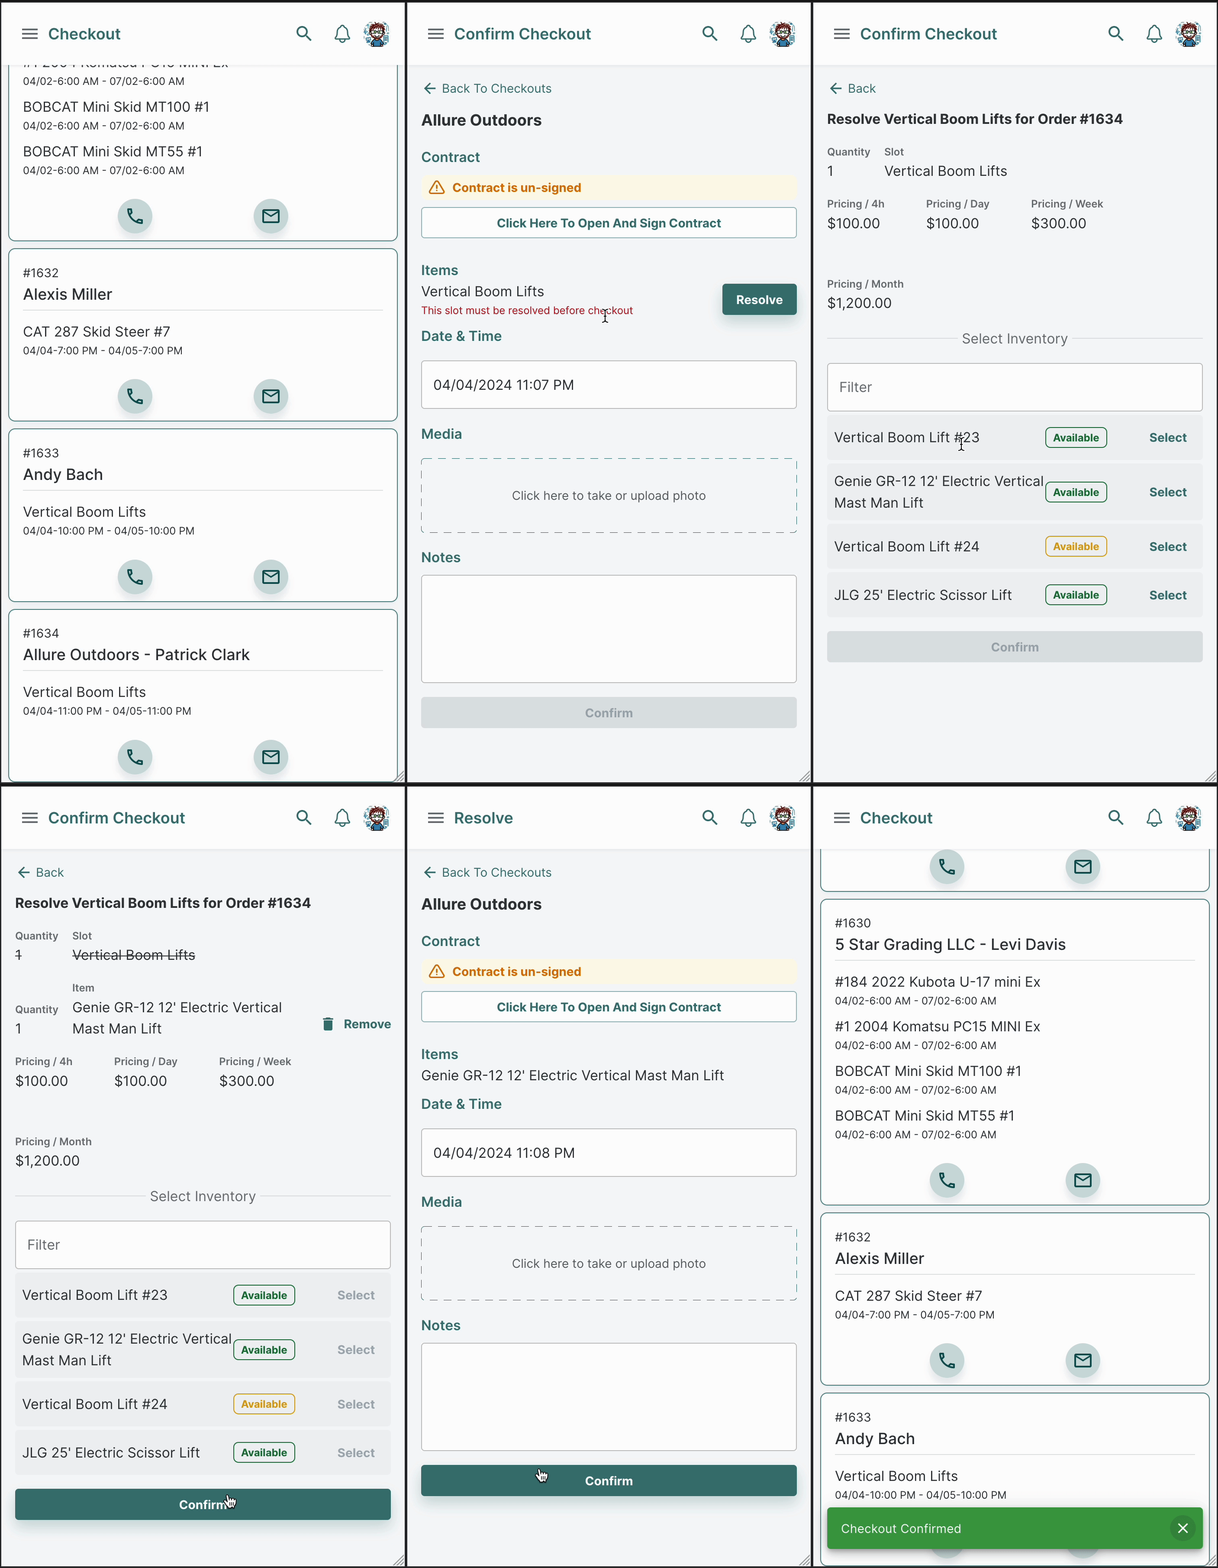
For further information, please read this Help Desk article.
Forms
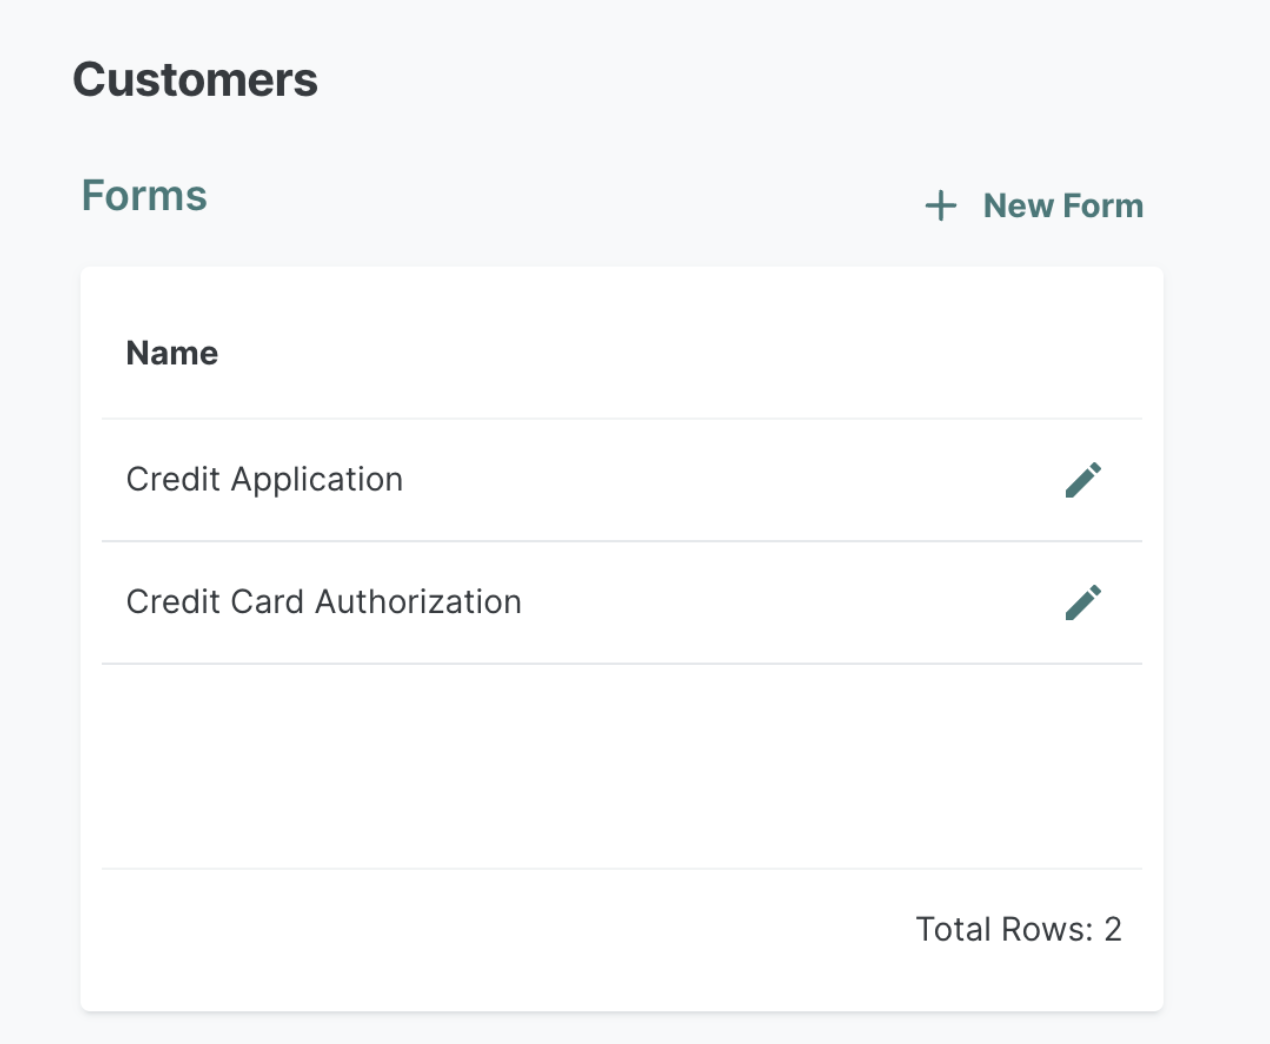
Today, we are launching our Forms feature! Creating and sending out Forms allows you to easily communicate and receive necessary paperwork through Renterra and have this information in one centralized place
Scheduled Maintenance

We're excited to launch our Scheduled Maintenance feature today! Creating schedules gives you the ability to automatically create work orders for your equipment as soon as they are due for maintenance.
Void Invoices

Today, we're releasing a new way to undo the effects of an invoice that cannot be deleted.
Invoices that cannot be deleted will now have a Void button, which will set the totals, and all line items to 0. Voided invoices can be safetly ignored, and all payments on voided invoices can be refunded.
See our documentation for more information.
Note: Some older invoices cannot be voided, however, all invoices created recently and in the future can be voided.
Automation for Orders
You can now control the automation on Orders for the follow two states:
Close out Completed Orders - With no outstanding billing remaning
Expire existing Quotes - From when they were created in the system
For more, check out our helpdesk section on Order Automation: https://help.getrenterra.com/en/category/order-dwj48x/
Service Requests
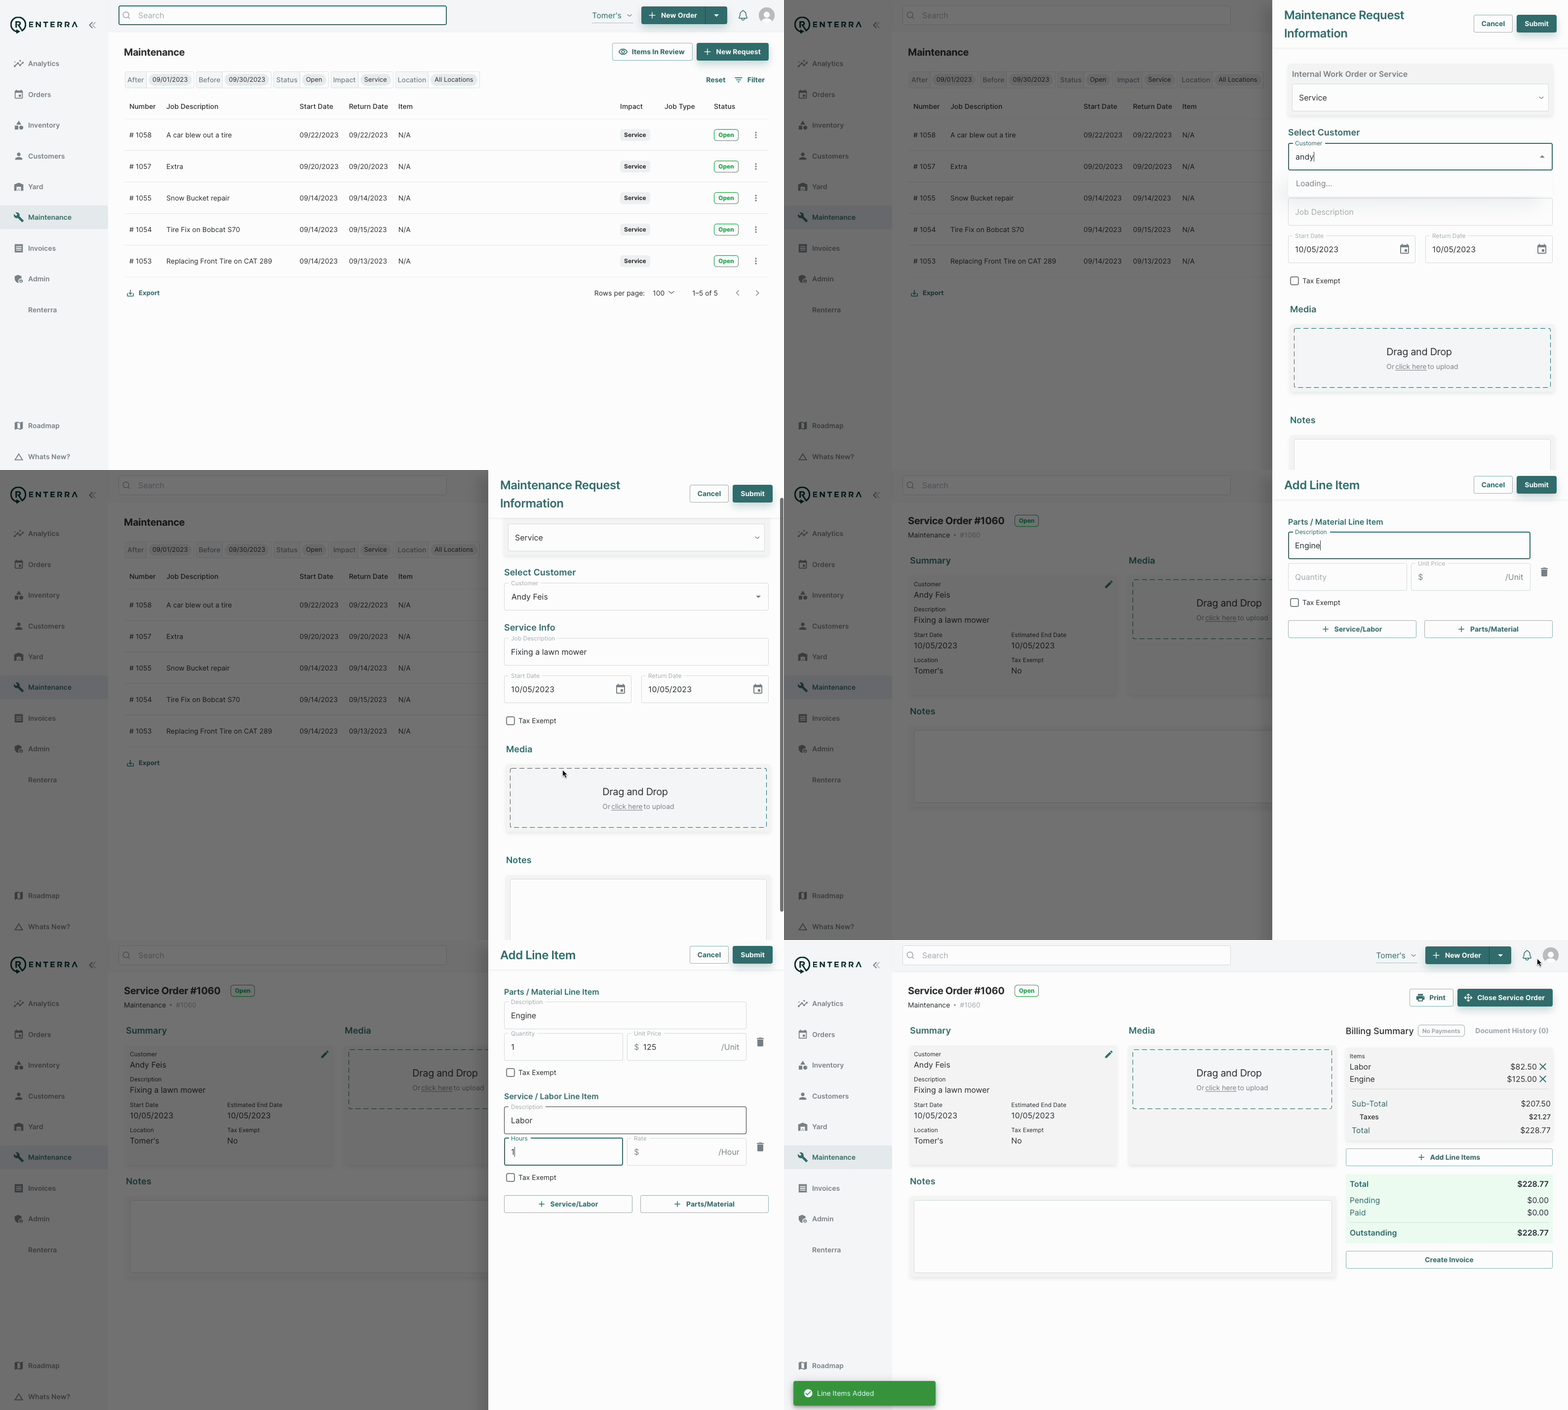
You can now create 2 types of maintenance requests:
Internal Work Orders - Maintenance requests on your own equipment. These have been available in Renterra since the beginning.
Service Requests - Maintenance requests from your customers on equipment that they bring in to your organization.
We've also added enhanced billing capabilities to all maintenance requests. You can now add line items, create invoices, and process payments in the same way that you can on rental orders.
For more, check out our helpdesk section on maintenance:
https://help.getrenterra.com/en/category/maintenance-1c2k36g/
Customer/Contact Intake
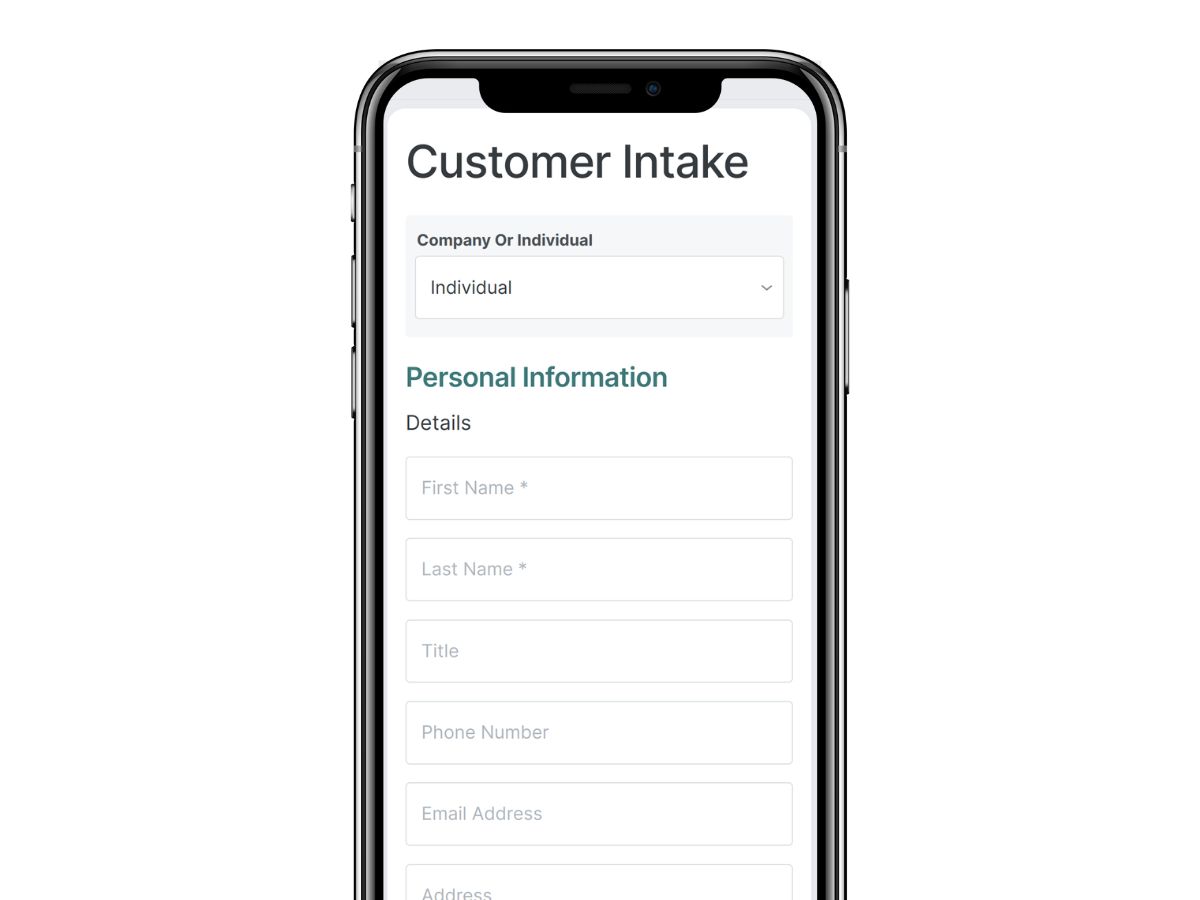
Text a link to new customer, have them fill out their contact information directly.
See our help desk article for more info
Use Cases
Increase efficiency in collecting new customer information, especially when serving multiple in-person customers or when you want to collect information at the customer's convenience
Avoid dictation mistakes by allowing the customer to enter the information
Inspection Checklists
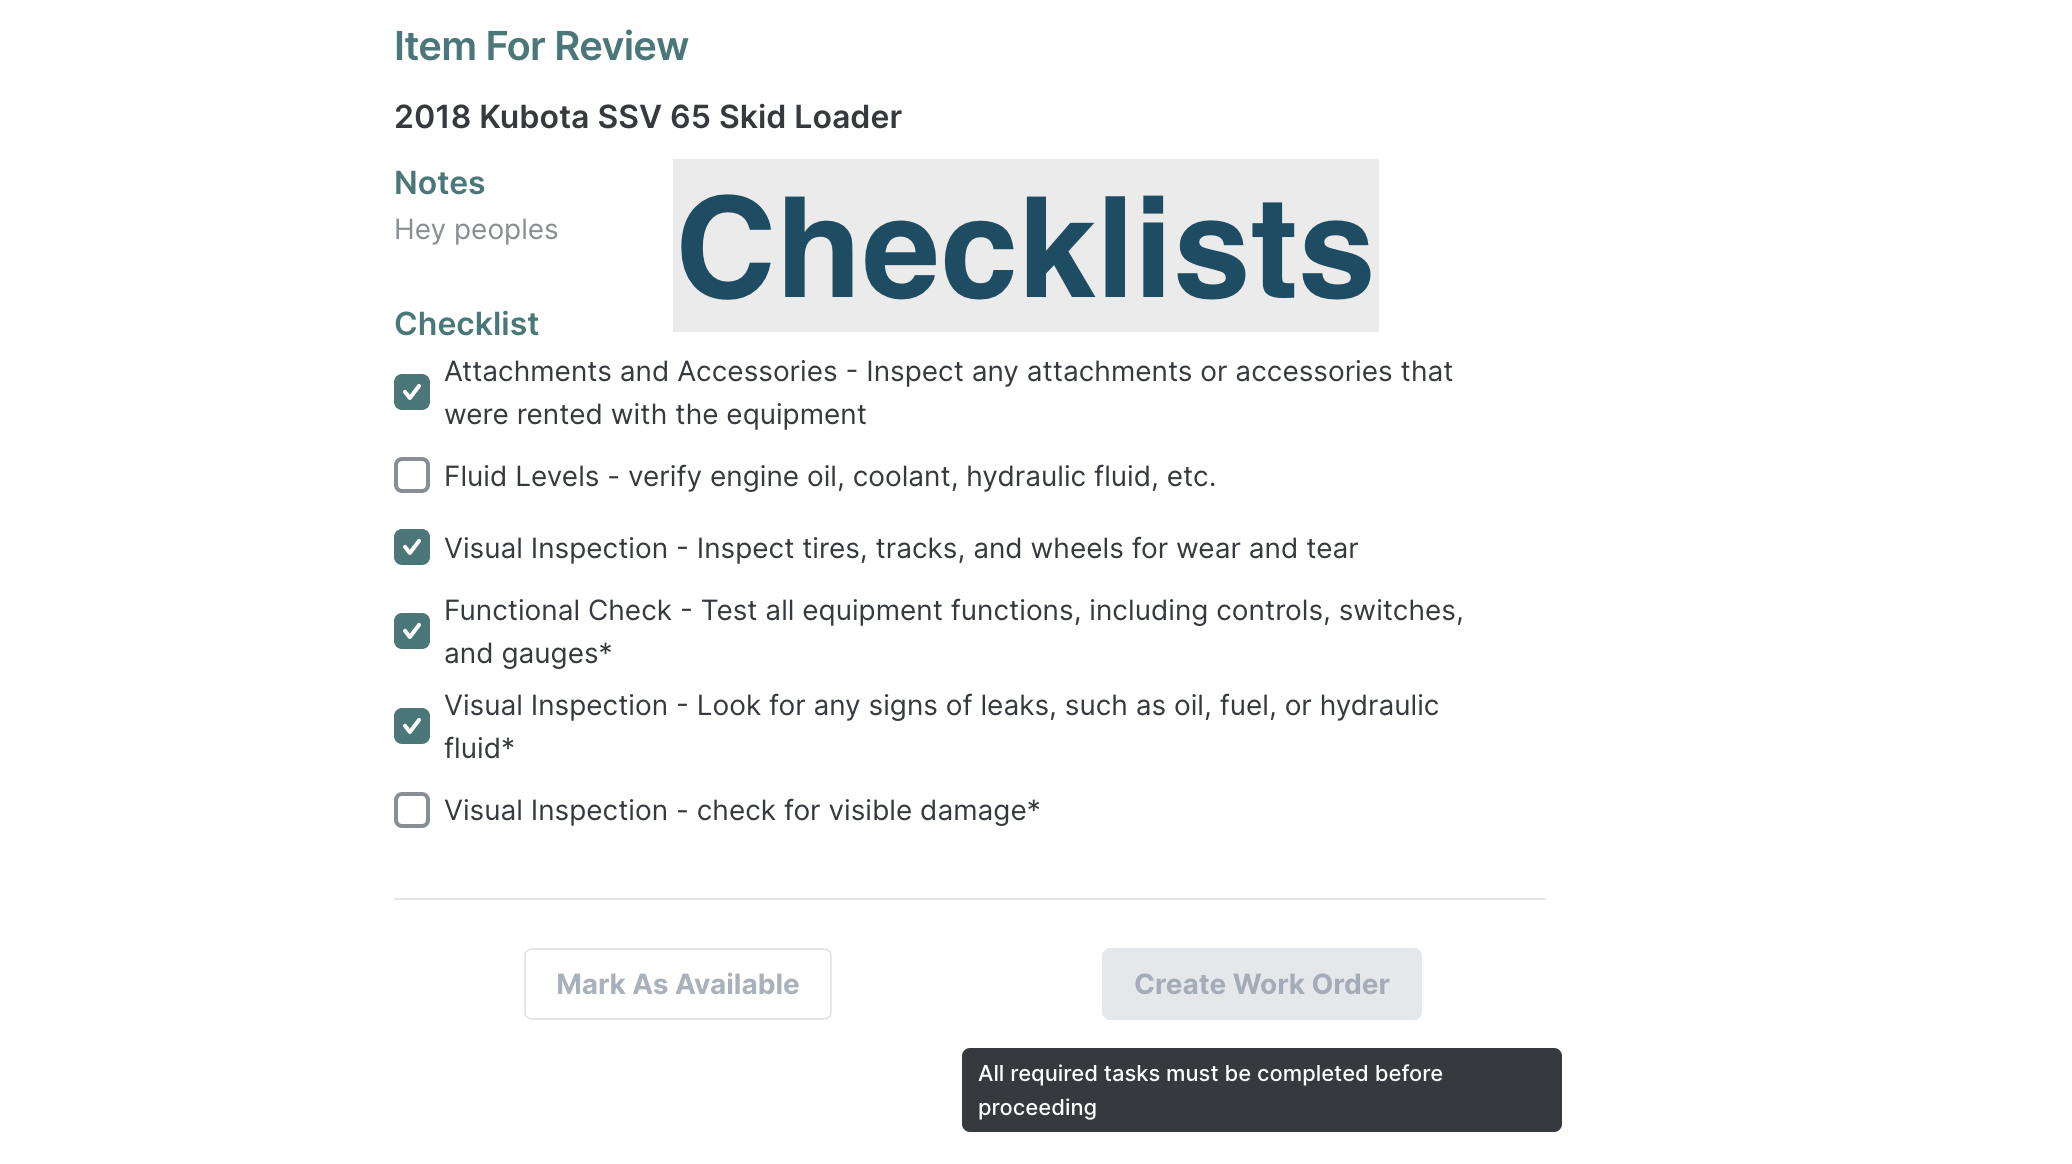
Admin users can now create and assign checklists to items during reviews.
See our helpdesk article for more info
Use Cases
Default Review Checklist - Assign a default checklist for all item reviews
Item-level Review Checklist - Assign different checklists to different items
Customer & Order Statements
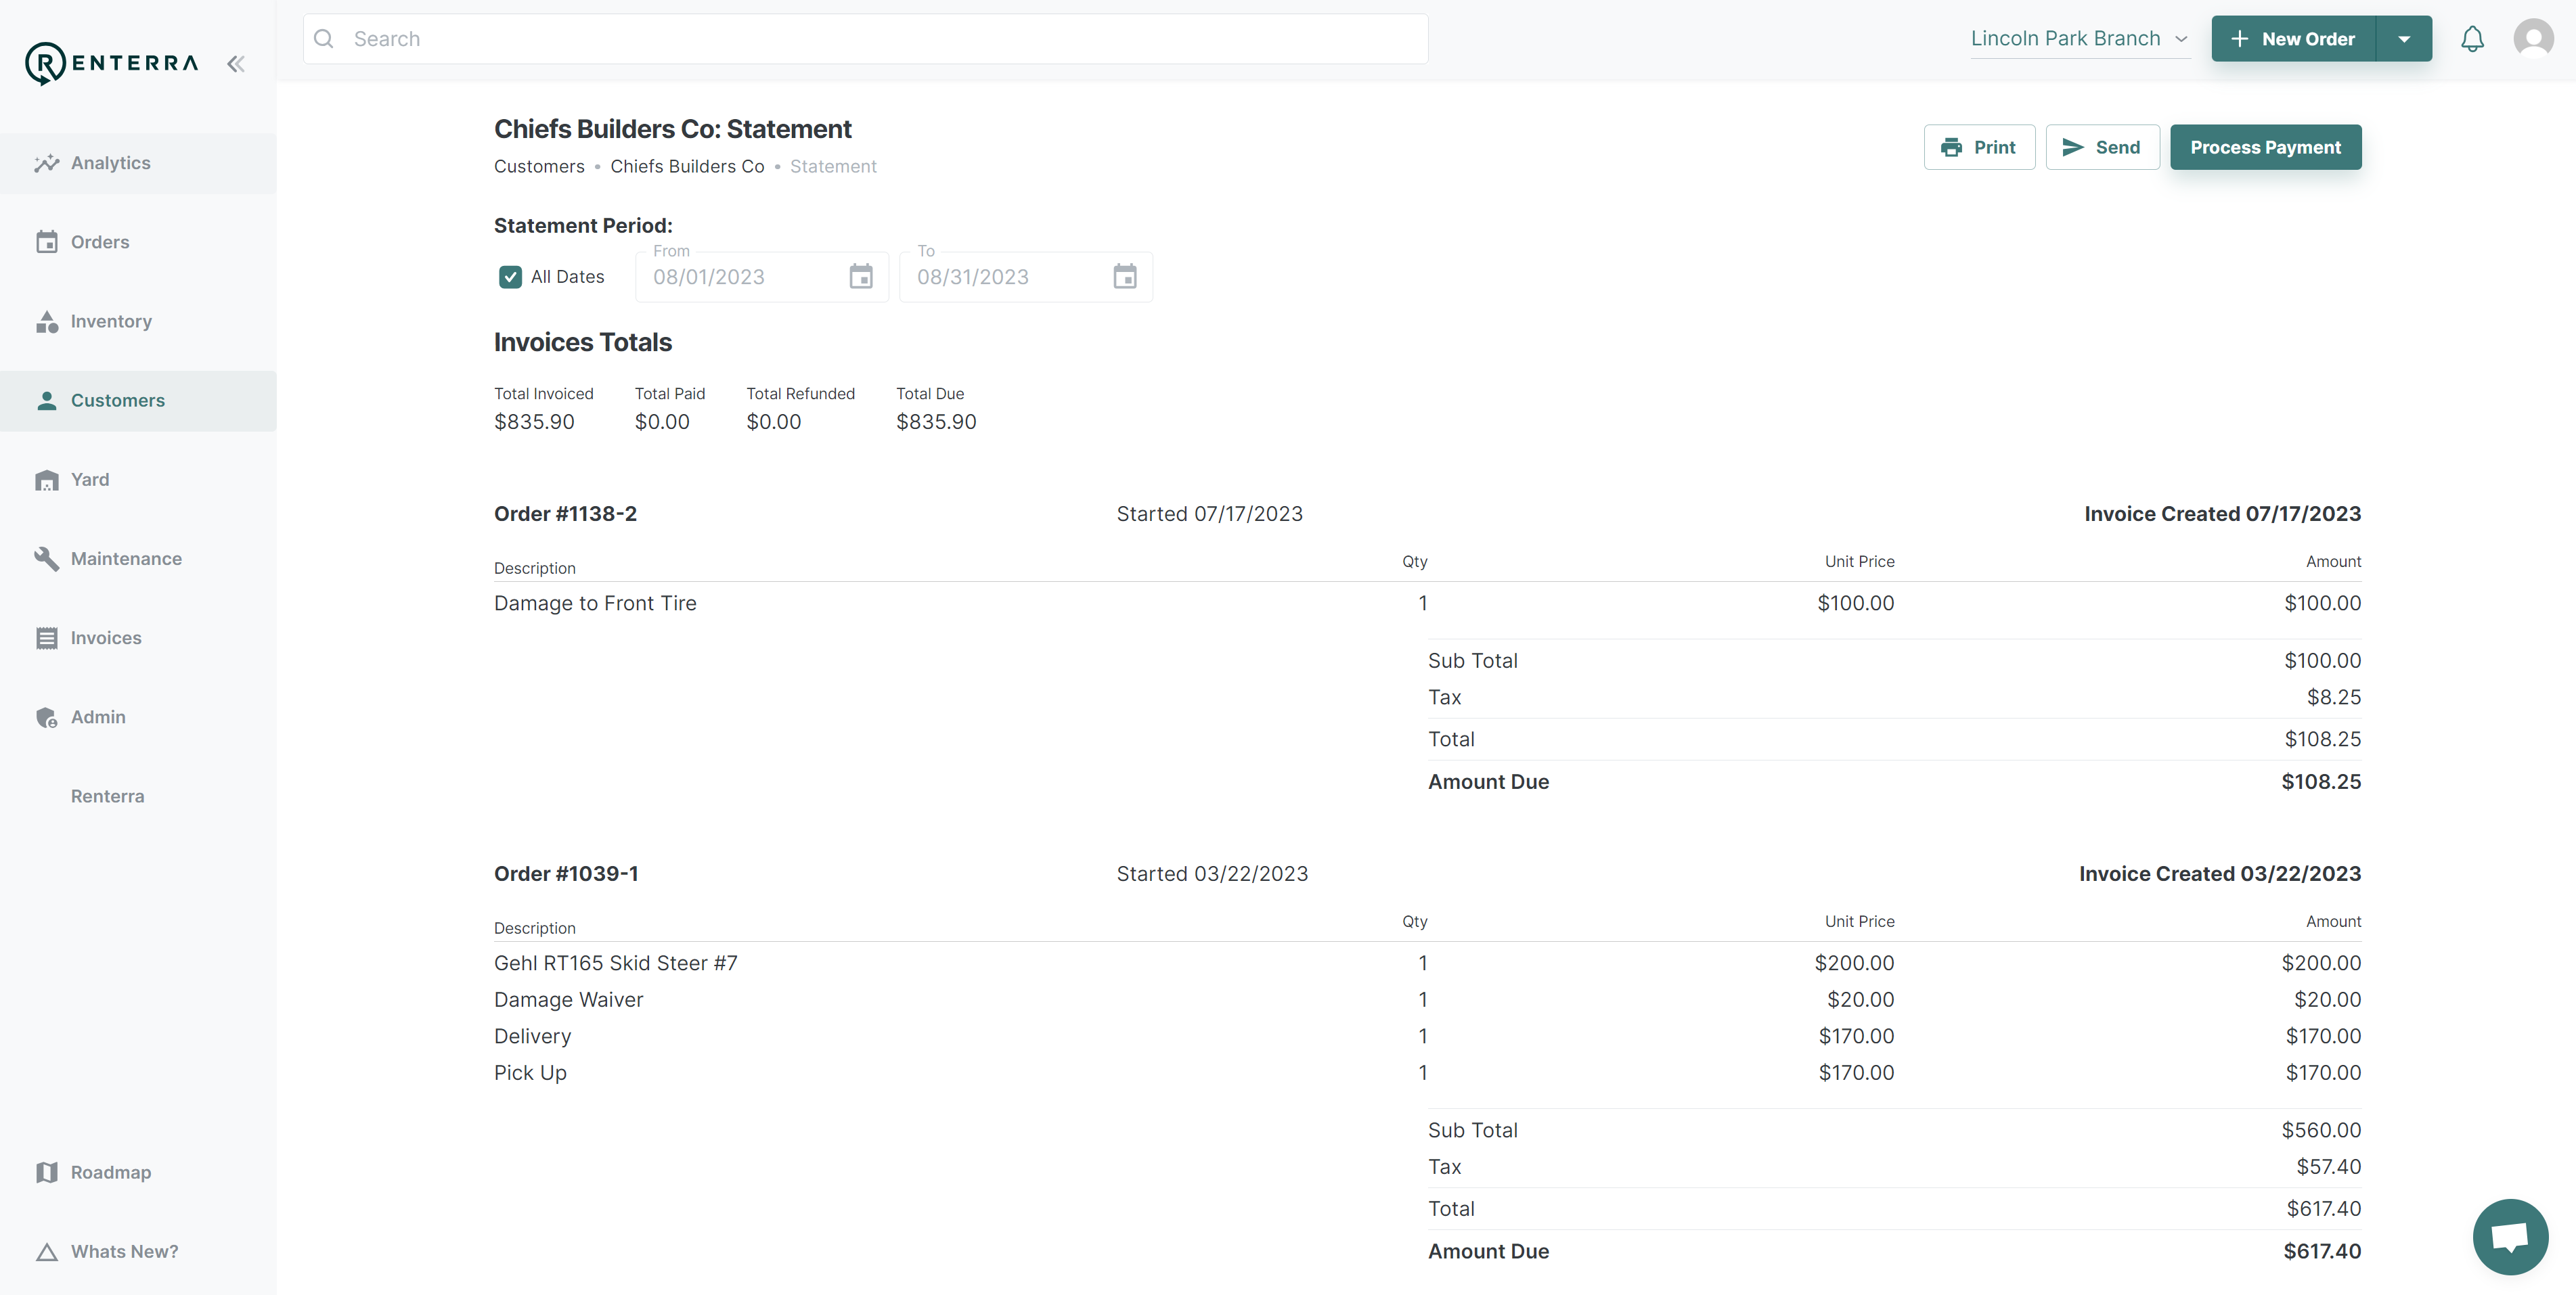
View an outstanding statement of unpaid invoices across a single Order or for a Customer. Process payments across those multiple invoices and send an invoice/receipt directly to your customer!
See our helpdesk articles for more information
Popular Use Cases
Customer
Pay off outstanding balance across multiple orders at once
Process end of month payment for all outstanding Invoices
Send a recap of outstanding balances directly to the Customer
Order
Process the net amount owning across multiple unpaid invoices. e.g. An initial invoice and an extension or partial refund.
Discounts
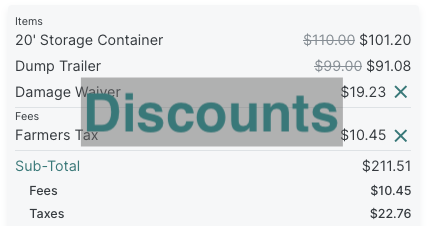
You can now institute a percent-off discount on rental assets on an order!
Use Cases
Add a discount to an order - Click the edit icon on the new "Order Settings" panel to add a discount to an order
Configure a customer to receive a discount on every order - Click on the "Settings" gear icon on a customer's page, and edit their account settings to add a discount.
Discounts show the original rates as "strike through" prices on the billing summary and on the contracts sent to customers.
Split Payments
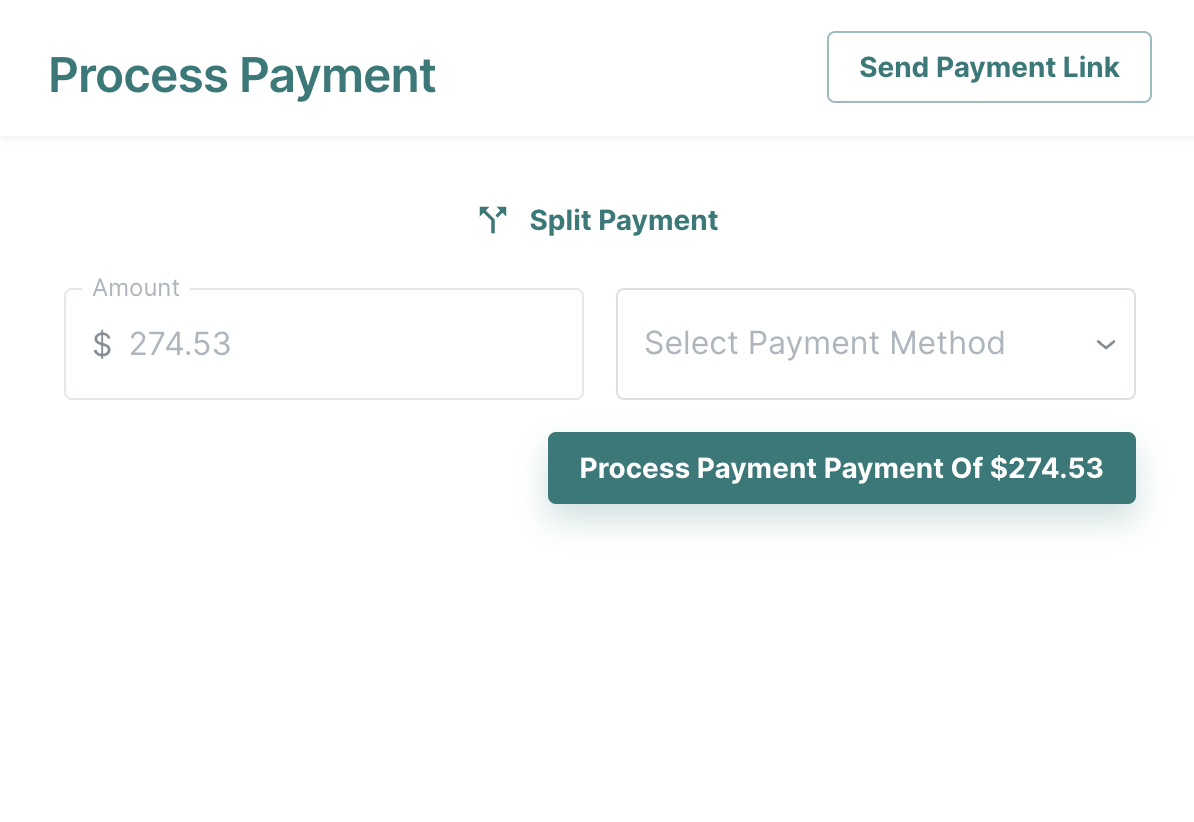
Description: We are excited to introduce a new feature that will make managing payments even more convenient for our users. With this latest update, you can now split a total payment across two different payment methods and charge both simultaneously. This enables you to leverage multiple sources of funds for a single transaction, giving you greater flexibility and control over your payments.
How to Use:
Select "Create Payment": Once you have the desired products in the order details page, and when you're ready, select the "Create Payment" button under the Billing Summary.
Choose your payment methods: On the payment page, you will now notice an additional option to "Split Payment" above the regular payment method field. Click on this option to enable the feature.
Allocate the payment amounts: Once you've activated the split payment feature, you'll see a breakdown of the total payment amount. Here, you can specify the amount you wish to charge to each payment method. You have the flexibility to split the payment equally or allocate specific amounts according to your preference.
Select the payment methods: In this step, you can choose the payment methods you want to use for the split payment. You can select from a range of options, including credit cards, cash, check, or any other supported methods available to you.
Authorize and confirm: After setting the payment amounts and selecting the desired payment methods, review the details and ensure everything is accurate. Once you are ready, click the "Confirm" button to initiate the payment process.
Successful payment confirmation: Congratulations! You have successfully completed a split payment using multiple methods.
We hope this new split payment feature enhances your payment experience by providing you with more flexibility and control over your transactions. As always, we value your feedback, so please don't hesitate to reach out to our support team if you have any questions or suggestions.
As always, thank you for choosing Renterra!
Enhanced Fee Support - Predefined Fees
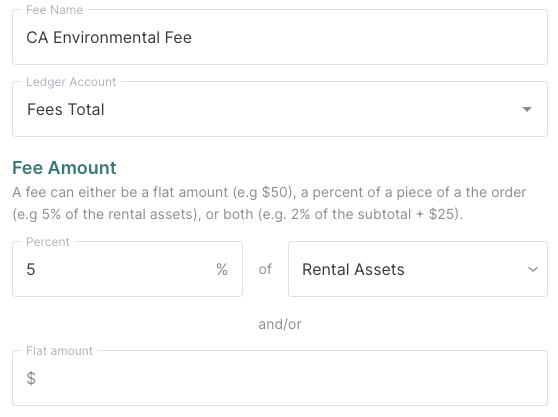
Starting today, you can write predefined line items that can be applied to any order as "fees".
All admins can define fees either as flat amounts, a percent of a piece of the order, or a combination of both.
Fees can be added to new orders when they are created, or added and removed from existing orders.
Quick Sale
Description: The Quick Sale feature is designed for situations where you want to sell items without creating a full rental transaction. It allows you to easily search among existing inventory items, check out customers, and charge them seamlessly.
How to Use:
From the drop-down menu in the "+New Orders" button at the top of the page, click on "Quick Sale."
A search interface will appear, allowing you to search for the items you want to sell
Enter relevant keywords or item details in the search bar and add any relevant Sale items with the appropriate quantity
If the sale is meant to be tax exempt, checkmark the "Tax Exempt" button
Once you have selected all the items for the quick sale, click on the "Process Payment" button.
After entering the necessary details, click on the "Charge" button to process the payment seamlessly.
Note: Quick Sale does not create a full rental transaction, and the sold items will be deducted from your inventory accordingly.
Enjoy the convenience of Quick Sale for hassle-free item sales!
Notifications
Introducing Notifications, a powerful feature that keeps you updated on key events happening in the Renterra system.
Get real-time notifications for important actions such as Cycle Bill invoice creations and payments received from payment links.
Notifications will appear conveniently in a dropdown menu accessible through the bell icon located in the top right corner of the screen.
How to Use:
Navigate to the top right corner of the screen, where you will find a bell icon.
Whenever a new notification is available, a red dot indicator will appear on the bell icon.
Click on the bell icon to open the dropdown menu.
In the dropdown menu, you will find a list of your recent notifications.
Each notification will include relevant details such as the event type, date, and additional information.
Click on a notification to view its full details or take appropriate action, if needed.
You can filter between your read, unread, and all of your notifications
We hope this new Notifications feature enhances your Renterra experience by keeping you informed about important events in a timely manner. Stay connected and never miss a beat with Renterra!
Data Table Exports
We are excited to introduce a highly anticipated feature in this release: the Data Table "Export" button. This new functionality empowers users to export data from Renterra tables based on the columns, filters, and rows currently displayed in their view.
Key Features:
Export Customized Data: Users can now export data in a table format by utilizing the Export Data Table button.
Flexible Selection: The feature allows users to choose specific columns, apply filters, and select desired rows to include in the exported data.
Improved Workflow Efficiency: This feature aims to enhance productivity by simplifying the process of exporting data, eliminating the need for manual data extraction or third-party tools.
How to Use:
Navigate to the table view displaying the desired data.
Customize the view by selecting specific columns, applying filters, and setting the desired rows to display.
Locate the Export Data Table button, found at the bottom of Renterra's data tables
Click on the "Export" button to initiate the export process.
Click on the downloaded file that now appears
Confirm the export action, and the file will be saved to the specified location.
We believe that the new Export Data Table feature will greatly benefit our users, enabling them to effortlessly extract and work with customized data sets. As always, we appreciate your valuable feedback, which helps us improve the product and shape future enhancements.
Stay tuned for more exciting features in upcoming releases!
Driver's License Scanner
Description: The "Drivers License Scanner" allows you to scan in a driver's license, pull in the key driver's license information, and save it all to a contact in Renterra
How to Use:
Click on the pencil icon to edit the contact.
A QR code will appear on the screen. Scan this QR code using your phone.
On your phone, a page will open with an option to "Take Photo" of the license.
Capture a photo of the license using your phone's camera.
The scanned information, including the name, license number, date of birth, and expiry date, will automatically load.
If the information is correct, hit the "Save" button to update the contact's information.
After submitting the changes, you need to refresh your browser to see the updated information in Renterra.
To view the scanned driver's license, you must click on the small drivers license icon that appears next to the contact's name
This new feature simplifies the process of adding a contact's drivers license and ensures accurate information is captured efficiently. Enjoy the enhanced functionality!

Support for Items Stocked at Multiple Branches
Our latest release introduces some enhancements to Bulk and Sale items for organizations with multiple locations.
Starting today, when all Bulk and Sale items will can be stocked at multiple branches.
Now when you add bulk or sale items to an order, you will be able to add a quantity beyond what's in stock in the current location. A warning will show up on the order reminding you to transfer stock in order to complete the order.


Field App Updates
Recent updates to the Field App introduces two major new features: New Order flow and full Inventory Management functionality.
The New Order flow enables users to create new orders on the go, streamlining the order creation process and increasing efficiency. Users can now input customer information, select the desired inventory, and specify delivery details all in one place, reducing the time and effort required to place orders.
In addition, the Inventory Management functionality provides field users with the ability to view, manage and transfer inventory.
Other improvements in include bug fixes and performance enhancements, most notably improvements to the photo and video upload speeds.
Inventory Calendar
View your entire Inventory (or a filtered version) via switching to the Calendar view on top of the Inventory page, or clicking here. You can change the view to see hourly for a day, or daily for week or month at a time.
Recommendations
Recommended items will now display under the item search during the New Order process. These items are based on your company's order history and will continue to update daily.
